
- Published on
GitLab On-Premise Setup and Configuration A Comprehensive Guide
- Authors

- Name
- Adil ABBADI
Introduction
Running GitLab on your own infrastructure provides ultimate control, compliance, and flexibility compared to managed services. With a self-hosted GitLab, your code, CI/CD pipelines, and user data remain entirely within your network. This comprehensive guide will walk you through every aspect of setting up and configuring an on-premise GitLab server, from installation to advanced runner management.
- Prerequisites and Infrastructure Planning
- Installing GitLab Community Edition
- Initial Configuration and User Management
- CI/CD Runner Setup and Advanced Configuration
- Conclusion
- Get Started with Your Self-Hosted GitLab
Prerequisites and Infrastructure Planning
Before diving into GitLab installation, it’s essential to prepare your infrastructure and prerequisites:
Hardware Requirements
GitLab performs best on a dedicated VM or bare metal server. For a small team or pilot project, allocate at least:
- 4 CPU cores
- 8GB RAM
- 100GB disk space
For production environments, scale based on user and CI/CD load.
OS and Dependencies
GitLab supports major Linux distributions. Ubuntu Server LTS is common; ensure it's updated:
sudo apt update && sudo apt upgrade -y
sudo apt install -y ca-certificates curl openssh-server
Consider installing postfix for email notifications:
sudo apt install -y postfix
Network and DNS Setup
- Open ports:
80(HTTP),443(HTTPS),22(SSH) - Set a fully-qualified domain name (FQDN) for your GitLab instance (e.g.,
gitlab.example.com) - Ensure DNS resolves the FQDN to your server’s IP
Installing GitLab Community Edition
With prerequisites in place, install GitLab Community Edition (CE):
Add GitLab Repository and Install
curl https://packages.gitlab.com/install/repositories/gitlab/gitlab-ce/script.deb.sh | sudo bash

sudo EXTERNAL_URL="https://gitlab.example.com" apt install gitlab-ce
During installation, GitLab configures services (NGINX, Redis, PostgreSQL) automatically.
Accessing Your GitLab Instance
After the install completes, browse to https://gitlab.example.com and set the initial root password.

SSL/TLS Configuration (Optional but Recommended)
To secure your server, configure Let’s Encrypt SSL:
sudo editor /etc/gitlab/gitlab.rb
# Set:
# external_url "https://gitlab.example.com"
# letsencrypt['enable'] = true

sudo gitlab-ctl reconfigure
Initial Configuration and User Management
Basic Setup
- Log in as root and change the password.
- Configure sign-up, visibility, and default project settings (
Admin > Settings).
Integrate Email Notifications
GitLab uses email for account recovery, notifications, etc. Set SMTP settings in /etc/gitlab/gitlab.rb:
gitlab_rails['smtp_enable'] = true
gitlab_rails['smtp_address'] = "smtp.example.com"
gitlab_rails['smtp_port'] = 587
gitlab_rails['smtp_user_name'] = "user@example.com"
gitlab_rails['smtp_password'] = "yourpassword"
gitlab_rails['smtp_domain'] = "example.com"
Then run:
sudo gitlab-ctl reconfigure
Adding Users and Groups
Through the web UI, invite team members and create project groups for access control.
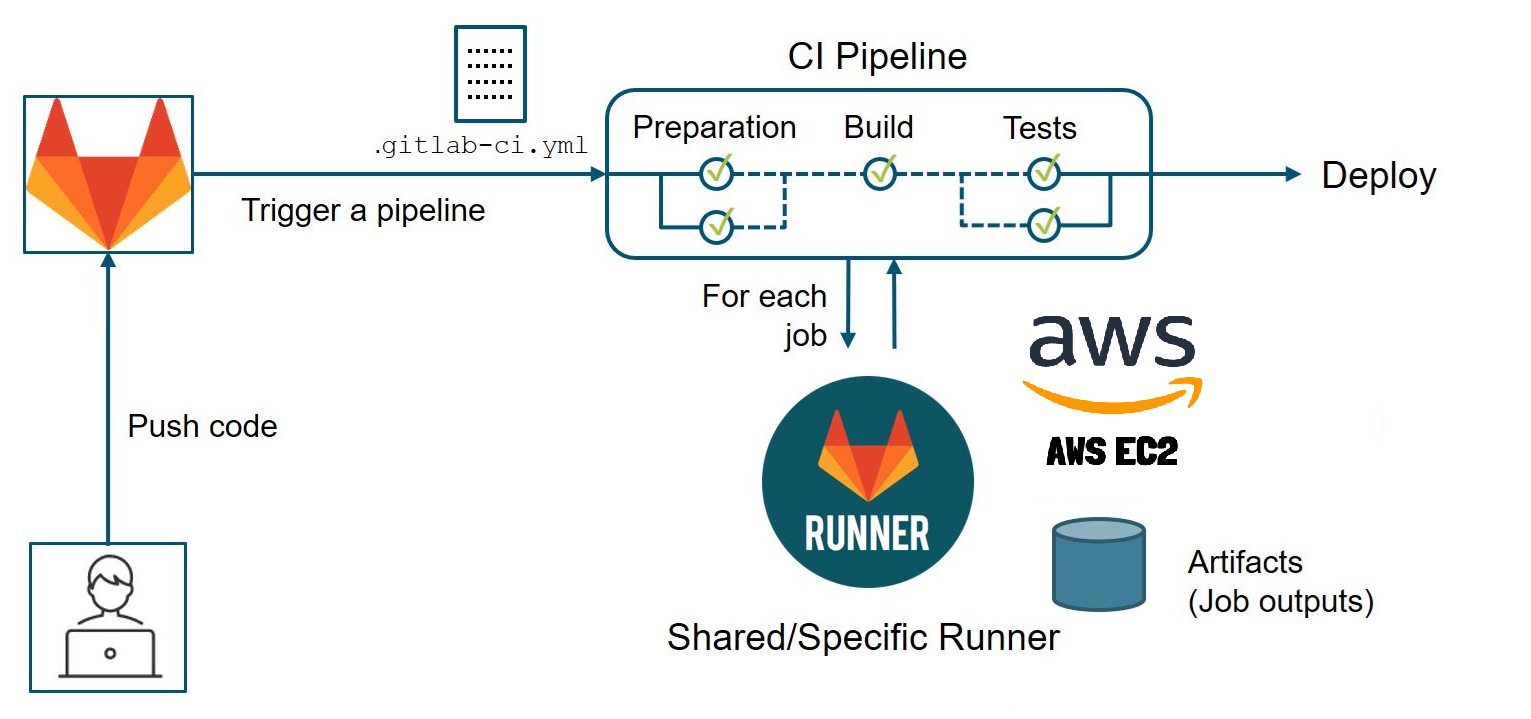
CI/CD Runner Setup and Advanced Configuration
To leverage GitLab’s CI/CD capabilities, register self-hosted runners:
Register a GitLab Runner
On a build server (can be the same or separate from GitLab):
sudo apt install gitlab-runner
Register the runner with your instance:
sudo gitlab-runner register
# Enter the GitLab instance URL and registration token found under Admin > Runners
# Choose executor (e.g., shell, docker, etc.)
Configure Runner for Docker
Edit /etc/gitlab-runner/config.toml for isolation and dependency management:
[[runners]]
  name = "docker-runner"
  url = "https://gitlab.example.com/"
  token = "xxxxxxxxxxxxxxxxx"
  executor = "docker"
  [runners.docker]
    image = "docker:latest"
    privileged = true
    volumes = ["/cache"]
Restart runner:
sudo gitlab-runner restart
Monitoring and Backups
- Use the built-in monitoring dashboard (
/admin/monitoring) - Schedule regular backups:
sudo gitlab-backup create
Automate with cron for disaster recovery readiness.
Conclusion
Setting up GitLab on-premise unlocks powerful version control, code review, and CI/CD benefits under your direct governance. By following these steps — from infrastructure planning and secure installation to user management and runner configuration — you ensure a robust, scalable development platform for your organization.
Get Started with Your Self-Hosted GitLab
Embrace the control and flexibility of self-hosted DevOps. Start customizing your GitLab instance today, and empower your team with secure, private, and enterprise-grade collaboration!