
- Published on
Mastering Azure Kubernetes Service (AKS) Deployment A Comprehensive Guide
- Authors

- Name
- Adil ABBADI
Introduction
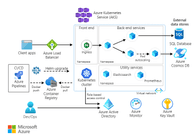
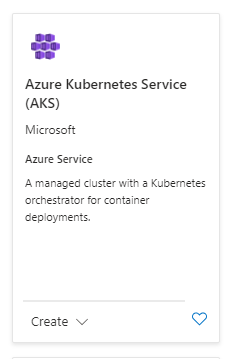
Azure Kubernetes Service (AKS) is a powerful managed Kubernetes solution provided by Microsoft Azure, enabling seamless deployment, management, and scaling of containerized applications. Whether you're migrating legacy workloads or building cloud-native solutions, understanding AKS deployment unlocks high efficiency, reliability, and agility for modern DevOps workflows.
- Preparing Your Azure Environment
- Deploying an AKS Cluster
- Deploying and Exposing a Containerized Application
- Conclusion
- Explore Further with AKS
Preparing Your Azure Environment
Before deploying workloads to AKS, you need to ensure your Azure environment is properly set up. This includes preparing your Azure account, installing CLI tools, and configuring necessary permissions.
1. Prerequisites & Azure CLI Installation
An active Azure account and the Azure CLI are essential. If you haven't already, download and install the Azure CLI:
# On Windows
Invoke-WebRequest -Uri https://aka.ms/installazurecliwindows -OutFile .\AzureCLI.msi; Start-Process msiexec.exe -Wait -ArgumentList '/I AzureCLI.msi /quiet'
# On macOS
brew update && brew install azure-cli
# On Linux
curl -sL https://aka.ms/InstallAzureCLIDeb | sudo bash
After installing, login to your Azure account:
az login
2. Configuring Resource Group and Permissions
A resource group is required to organize your AKS resources:
az group create --name aks-demo-group --location eastus
Ensure you have the necessary RBAC permissions. Assign Contributor role if needed:
az role assignment create --assignee <your-object-id> --role Contributor --resource-group aks-demo-group
Deploying an AKS Cluster
Once your environment is ready, you can deploy an AKS cluster that hosts your container workloads. AKS simplifies the orchestration by automating control plane management, patching, and scaling.
1. Creating the AKS Cluster
Use the Azure CLI to create an AKS cluster. This example provisions a basic cluster with three nodes:
az aks create \
  --resource-group aks-demo-group \
  --name aks-demo-cluster \
  --node-count 3 \
  --enable-addons monitoring \
  --generate-ssh-keys
This command enables built-in monitoring (Azure Monitor) and SSH keys for secure access.
2. Connecting to AKS with kubectl
Install kubectl, the Kubernetes command-line tool:
az aks install-cli
Configure kubectl to connect to your new AKS cluster:
az aks get-credentials --resource-group aks-demo-group --name aks-demo-cluster
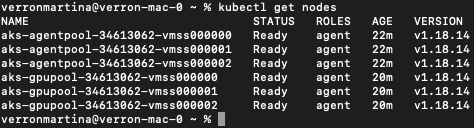
kubectl get nodes
You should see a list of your AKS cluster nodes, confirming the cluster is running.
Deploying and Exposing a Containerized Application
With your cluster operational, the next step is to deploy a containerized application and expose it to the internet or internal network.
1. Deploying a Sample Application
For this walkthrough, let’s deploy a simple nginx web server using a Kubernetes deployment manifest.
Create a file named nginx-deployment.yaml:
apiVersion: apps/v1
kind: Deployment
metadata:
  name: nginx-deployment
spec:
  replicas: 2
  selector:
    matchLabels:
      app: nginx
  template:
    metadata:
      labels:
        app: nginx
    spec:
      containers:
      - name: nginx
        image: nginx:1.25
        ports:
        - containerPort: 80
Apply the manifest to your cluster:
kubectl apply -f nginx-deployment.yaml
kubectl get pods
2. Exposing the Application
To make your app accessible, expose it using a Kubernetes service. Create nginx-service.yaml:
apiVersion: v1
kind: Service
metadata:
  name: nginx-service
spec:
  type: LoadBalancer
  ports:
    - port: 80
      targetPort: 80
  selector:
    app: nginx
Apply the service and check the external IP:
kubectl apply -f nginx-service.yaml
kubectl get service nginx-service
After a few minutes, the EXTERNAL-IP field will display an address you can use to access your nginx app in a browser.
3. Monitoring Your Application
You can monitor your AKS workloads with Azure Monitor or by running:
kubectl get pods -o wide
kubectl logs <pod-name>
Conclusion
Deploying applications with Azure Kubernetes Service (AKS) streamlines container orchestration, scalability, and management, allowing you to focus on building solutions rather than infrastructure. By following these steps—preparing the Azure environment, deploying the cluster, running workloads, and monitoring—you are well-equipped to harness the power of AKS in your cloud-native journey.
Explore Further with AKS
Dive deeper into rolling updates, auto-scaling, secure networking, and CI/CD pipelines on AKS. Future-proof your infrastructure and accelerate your DevOps transformation with Azure Kubernetes Service today!